
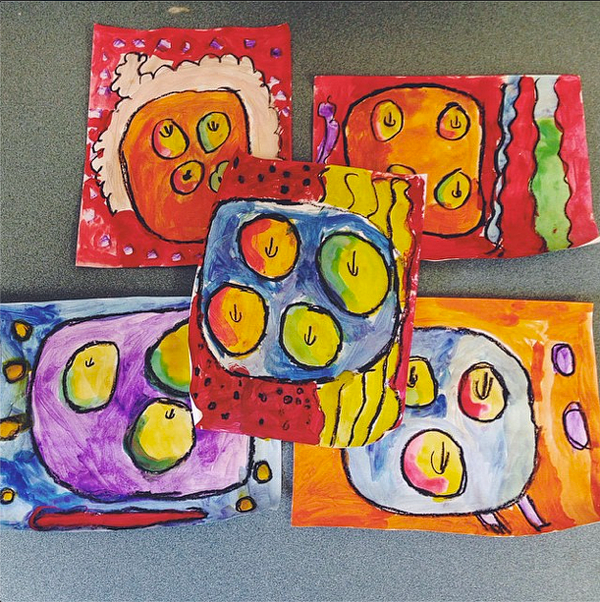
I was SO pleased with how these turned out! It only took one class period, which is always nice, and the kids really enjoyed making them. We reviewed what a still life is [because we just completed a Van Gogh sunflower still life], and looked at a few of Cezanne's apple paintings. I will write out the steps below [although I feel that it's pretty self explanatory].

Step 1: Draw three or four circles. [so easy] I used black pastels, but black crayons would be alright.
Step 2: I told the kids to draw a "u" with a little line on it to create the stems.
Step 3: Draw the plate [or bowl] around the apples. It doesn't need to be perfect!
Step 4: Design your table cloth. This is where they can really have fun with it and make it their own.
Step 5: I had the students paint only one side of each apple either red or green. [I used tempera cakes.]Step 6: Add yellow to all of the apples and go back and add more red or green [or orange]. Mixing colors on the paper is fine!
Step 7: Finish the rest of the painting. I encouraged them to paint the plate only 1 color so that the apples stood out more. But they could paint the table cloth any way they wanted.
Step 8: This is the hardest part, but I think it makes a huge difference. [Carefully] Go back over your black pastel marks. They will have to be careful because the paper will probably still be wet in places. We JUST painted and used pastels on top for our last project, so my kids were really good about taking their time with the pastels.

Great lesson. Love the simplicity!
ReplyDeleteThank you Christianne!
ReplyDeletethank you , certainly will try with my grandson !
DeleteSuper cute. Love the colors!
ReplyDeleteThank you so much Patty! I love everything you do. I took your e-course a couple of summers ago and it was amazing! :)
ReplyDeleteI really appreciate this post. This is a great lesson for me to do with my daughter. Thanks much!
ReplyDeleteLooking forward to trying this project with my 1st and 2nd graders! Thanks for the idea!
ReplyDeleteGreat lesson, transferring to an elementary school this week great start to see what they can do.
ReplyDeletelove love love!! so simple so beautiful. and love step by step examples!!
ReplyDeleteI hope you don’t mind. I wrote a post about this lesson at my blog, Art Sub Lessons, and linked back here. It is a wonderful lesson that you have explained so well, I think a sub could teach it. https://artsublessons.blogspot.com/2018/03/art-sub-lesson-easy-cezanne-still-life.html
ReplyDeleteI’d love to see what you did with the sunflowers.
ReplyDeleteI am new to teaching art and I appreciate what you have to share. So very helpful and inspiring for me to get started....Thank you!!!
ReplyDeleteYes, I would love to see more step by step lessons. Thank you, I loved it, I will try it with my students today!
ReplyDeleteHow large is the paper? Is it watercolor paper or something else?
ReplyDelete