Hi guys!
It's has been a while since I posted (since I went on maternity leave almost a year ago!) So it's about time for a new post.

We've had this entire week off from school due to the devastation from Hurricane Matthew, so during one of the workdays I decided to change my next 5th grade lesson to something more lighthearted for the kids. We are going to be creating prints of Emojis! I don't know about your kids, but mine are obsessed with emojis. This project is simple and fun, and you can bring in lots of artists as reference, but I think Andy Warhol is my go-to for printmaking like this.
Ok, here we go!
Step 1- I am using styrofoam plates for this project as my stamp. They are affordable and easy to find. I think a pack of 150 is like $8? The students will cut the plates into a 4x4 square.
Step 2- I'm going to have them trace a cup to create the circle.
Step 3- Draw your emoji. Make it up or copy one (bring in that Andy Warhol pop culture info!) and have images some for reference.
Step 4- make your lines thicker and color everything that you want to be black with a sharpie.


It's has been a while since I posted (since I went on maternity leave almost a year ago!) So it's about time for a new post.
This full lesson plan is included in my 5th Grade Curriculum Lesson Pack, which can be found in my TpT HERE!
We've had this entire week off from school due to the devastation from Hurricane Matthew, so during one of the workdays I decided to change my next 5th grade lesson to something more lighthearted for the kids. We are going to be creating prints of Emojis! I don't know about your kids, but mine are obsessed with emojis. This project is simple and fun, and you can bring in lots of artists as reference, but I think Andy Warhol is my go-to for printmaking like this.
Ok, here we go!
Step 1- I am using styrofoam plates for this project as my stamp. They are affordable and easy to find. I think a pack of 150 is like $8? The students will cut the plates into a 4x4 square.
Step 2- I'm going to have them trace a cup to create the circle.
Step 3- Draw your emoji. Make it up or copy one (bring in that Andy Warhol pop culture info!) and have images some for reference.
Step 4- make your lines thicker and color everything that you want to be black with a sharpie.
Step 5- Trace around everything with a pencil...not too sharp!
Step 6- Then "color" everything that you want to be "white" (the background paper) with a pencil or colored pencil. Make sure you press hard enough to indent, but not so hard that you punch a hole in it.
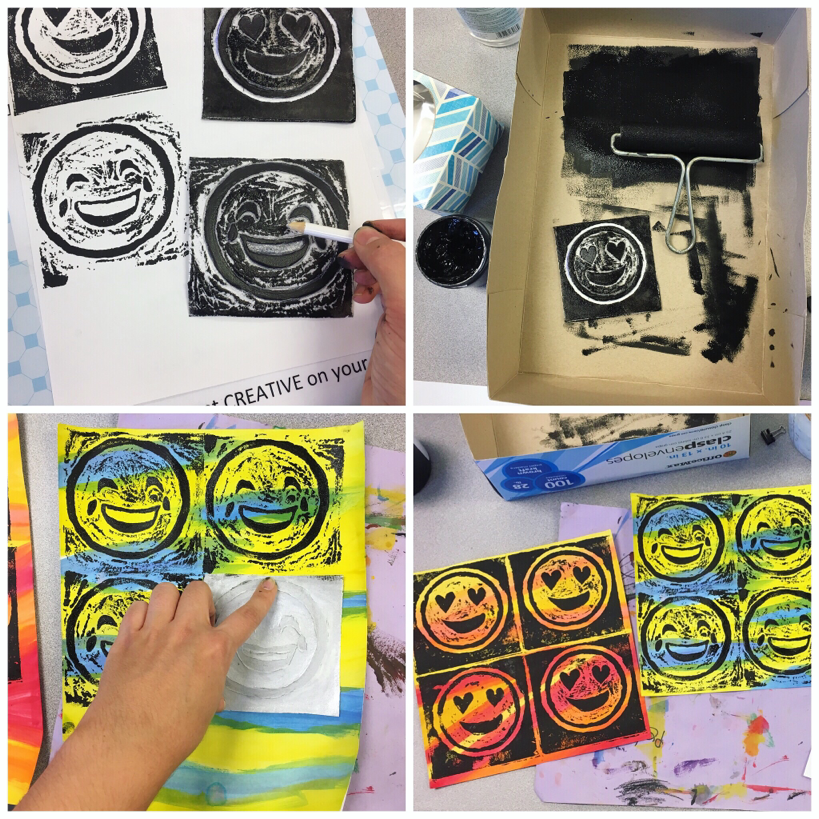
Step 7- Ink your stamp using a brayer. I also had to add a little bit of water to my ink.
Step 8- Try it out on an extra piece of paper.
Step 9- If there are any places that got ink where you didn't want it, go ahead and "color" those areas again.
Step 10- Get your painted background paper ready. (I plan on having the kids do this before creating their emoji so it can dry.)
Step 11- Print your stamp, and remember it won't be perfect! Pressing along the black raised areas helps.
Step 12- Admire your work!
I hope you guys found this informational! Share pictures if you do this project in your own room!